Plugin Development
Creating a new Plugin allows you to integrate your favorite external Software or Hardware into adaptor:ex. A custom plugin can also be useful to improve the workflow for you and everyone on your team even if you use APIs that already have an adaptor:ex plugin.
With your own Plugin you can
- add any number of new actions to the editor
- provide plugin items that allow individual settings to access your API
- store consistent data
- listen on and dispatch events throughout adaptor:ex games
There is never enough time
To document the many ways you can extend adaptor:ex using plugins is a project in itself that we did not find all the necessary the time for. See also: Miscellaneous.
To browse the source code of existing plugins take a look into the adaptor:ex server internal plugins directory and goto npmjs.org and search for adaptorex-plugin. We also published some of our project specific plugins to our gitlab repositories on gitlab.com/machina_ex.
Also: please feel free to contact us on our Discord or via email or submit an issue on Gitlab or Github if you need assistance.
Where to put your plugin
External plugins can be provided in a local directory or as npm package on npmjs.org.
If there is an npm package plugin on npmjs.org with the same name as your local plugin the npm package will be ignored.
Local Plugins
For adaptor:ex to recognize plugins on your computer they need to be located in one of the plugins directories.
The default plugins directory is in your adaptor:ex data directory (default is adaptorex in the directory the app has been started). Thats where your assets and functions live too.
The adaptor:ex config allows you to define additional plugin directories. Add a new entry plugins to the config.json file. This entry is an array that can have any number of directory paths. adaptor:ex will search through all of them in order to find plugins.
{
    "host": "http://localhost",
    "port": 8081,
    "data": "./adaptorex",
    "plugins": [
        "/home/ada/development/my_plugins"
    ],
}
Find out more about configuration in the adaptorex server Readme.
Once you moved your plugin files, a restart of adaptor:ex is required.
Development Plugins
since Version 2.10.2
If you are currently working on your plugin it is best to move it into the separate development folder inside the plugins directory. Plugins inside adaptorex/plugins/development will not be installed but linked into the project. This way you will not need to reinstall the plugin after every change.
adaptorex
├── games
├── log
├── nedb
├── plugins
|   └── development
|       └── my-plugin <--
└── config.json
adaptor:ex watches the development folder for changes and reloads your plugin on every change in one of the files.
This will only work if you are using a source install of adaptor:ex. If you are developing a plugin using adaptor:ex npm packages or docker containers, package linking can not resolve dependencies.
If you add files or folders to plugins in the development directory you will still need to restart adaptor:ex to make the changes take effect.
If you changed or added plugin dependencies you will need to also run
In the adator:ex command line.
Example Plugin
You will find most code snippets in this documentation gathered in our example plugin at the adaptor:ex gitlab repository.
Use it if you want boilerplate code to get startet. To use it either git clone the repository or download the source files and move them into your plugins directory.
To setup your own repository, first delete the .git directory or move files to a new folder.
Download from gitlab.com/machina_ex/adaptor_ex/plugins/adaptorex-example, then unzip and move it into your plugins directory. E.g.:
Once you changed the directory name and/or the plugin name in the package.json you will need to restart your adapotor:ex instance.
NPM Packages
since Version 2.10
If you have a plugin that you want to reuse or share easily you can publish it on npmjs.org. adaptor:ex will look for plugins in the npm registry that have the keyword adaptorex-plugin, list them in the editor and download and install them if added to a game.
To upload your plugin to the npm registry you need to create an account on npmjs.org. Follow the instructions in the npm documentation on how to register and publish your own packages.
For adaptor:ex instances to be able to discover your Plugin make sure your plugin package.json follows the additional adaptor:ex plugin rules described below.
After you have published your plugin and adaptor:ex has internet access, you can add it to your game like any other npm package.
File Structure
A plugin is a node module that can be imported by adaptor:ex if it is located in a local plugin directory or on npm and is accompanied by a file called package.json that follows a small set of rules.
Package.json
The package.json has to be a valid npm package file with name and version and the following additional rules:
-
There needs to be a property
adaptorexwith the keysnameandtitlethat define how the plugin is displayed in the editor. It can but doesn't have to be the same as the packagename -
To be discoverable you need to add
adaptorex-pluginto thekeywordsarray.
We recommend to also mention adaptor:ex in the package name, e.g. adaptorex-myfavoriteapi. You can then use a more compact name in the adaptorex name property.
{
    "name": "my-adaptorex-plugin",
    "version": "0.0.1",
    "adaptorex": {
        "name": "my-plugin",
        "title": "My Plugin"
    },
    "keywords": [
        "adaptorex-plugin"
    ]
}
Entry File
Like other npm packages your plugin needs to provide an entry file that can be defined in the package.json with the main property. The default entry file is index.js.
If you want to use a different entry file you can define it in the package.json:
{
    "name": "my-adaptorex-plugin",
    "version": "0.0.1",
    "adaptorex": {
        "name": "my-plugin",
        "title": "My Plugin"
    },
    "keywords": [
        "adaptorex-plugin"
    ],
    "main": "my-plugin.js"
}
Then create the respective file in your plugin directory.
NPM Pre Release Version
Per default adaptor:ex instances will ignore npm plugins that have a version number lower than 0.1.0 so you can test upload your plugin without overcrowding other peoples instances. To make your own instance show your pre release npm plugin you need to change the default behavior using minNpmPluginVersion in the adaptor:ex server configuration.
The Plugin Module
adaptor:ex will require the plugin once it is added to at least one of your games. To make a plugin work within a game it needs to export a certain set of functions.
The plugin can either export a class with the name Plugin
or export functions directly in the module.exports object
We recommend to use the javascript class syntax and create a Plugin class. This way you follow the style of most other plugins and make it easy to extend properties and functions from existing modules.
For the sake of consistency we will use the class syntax in the following chapters.
Plugin functions work like hooks to the adaptor:ex game lifecycle. They are called on user interaction in the editor or in specific moments during a live show.
Plugin main class
In order to streamline your Plugin class and make it easier to work with the adaptor:ex game api, we recommend to extend the adaptor Plugin base class.
class MyPlugin extends adaptor.Plugin {
    constructor() {
        super(setup)
    }
    setup(config, game) {
        super.setup(config, game)
    }
}
module.exports.Plugin = MyPlugin
It provides several useful functions and properties that help integrating your plugin.
Setup
setup function
Every plugin needs to export a setup function. This function will be called by adaptor:ex when the plugin is added to a game and on each restart.
The setup function will be called with two parameters.
-
config - the latest configuration of the plugin as loaded from the database. Values depend on the plugins initial configuration and any changes the plugin might have applied before.
Also comes with a
logfunction with the proper prefix and an expressappobject to add custom endpoints for you plugin. -
game - the game api object of the game the plugin is added to. A lot of functions and values that allow the plugin to access the current game context.
global adaptor variable
To access general properties and methods of the adaptor:ex server you can use the global adaptor variable.
The setup function needs to return a json object that will be saved in the adaptor:ex database and defines how users can interact with the plugin.
let setup = {
    "settings": {
        "type": "object",
        "title": "My Plugin",
        "description": "My very own plugin",
    }
}

class MyPlugin {
    constructor() {}
    setup(config, game) {
        return setup
    }
}

module.exports.Plugin = MyPlugin
If you extend the adaptor:ex Plugin class you should call the super.setup method first. It will merge all config properties and the game parameter, create a log context and allows to integrate Plugin item constructors.
class MyPlugin extends adaptor.Plugin {
    constructor() {}
    setup(config, game) {
        super.setup(config, game)

        this.log(`Setting up ${this.name}`)
    }
}
setup json
The setup object has all the initial configuration of the plugin. It defines what kind of settings the plugin has, what actions it provides and what kind of data it stores.
The setup consists of any of the following properties:
General Configuration like API settings, credentials etc.
Configuration of plugin items that can have multiple entities with separate settings. Like physical devices, separate servers, users etc.
All the actions the plugin provides with the options each action allows.
Variables and their structure that actions might generate or return when used in a game session.
Structure and types of data items the plugin might generate and use.
Json schema definitions the plugin can reference within the setup json to avoid redundancies. There are definitions available from other plugins and the adaptor:ex core.
Each property is a json schema that defines the structure of the data your plugin can work with. The adaptor:ex editor will use the schema to generate the required forms for settings, actions and data collections and provide the respective items to use inside actions.
Note
We recommend using a separate file for your plugins configuration schema. Following examples will assume a file called setup.json that is being imported in the index.js file.
Settings
The settings property defines the general configuration options for your plugin. This can include API credentials, connection settings, default values, or any other configuration that applies to the plugin as a whole rather than to individual items.
Settings are optional and can be empty.
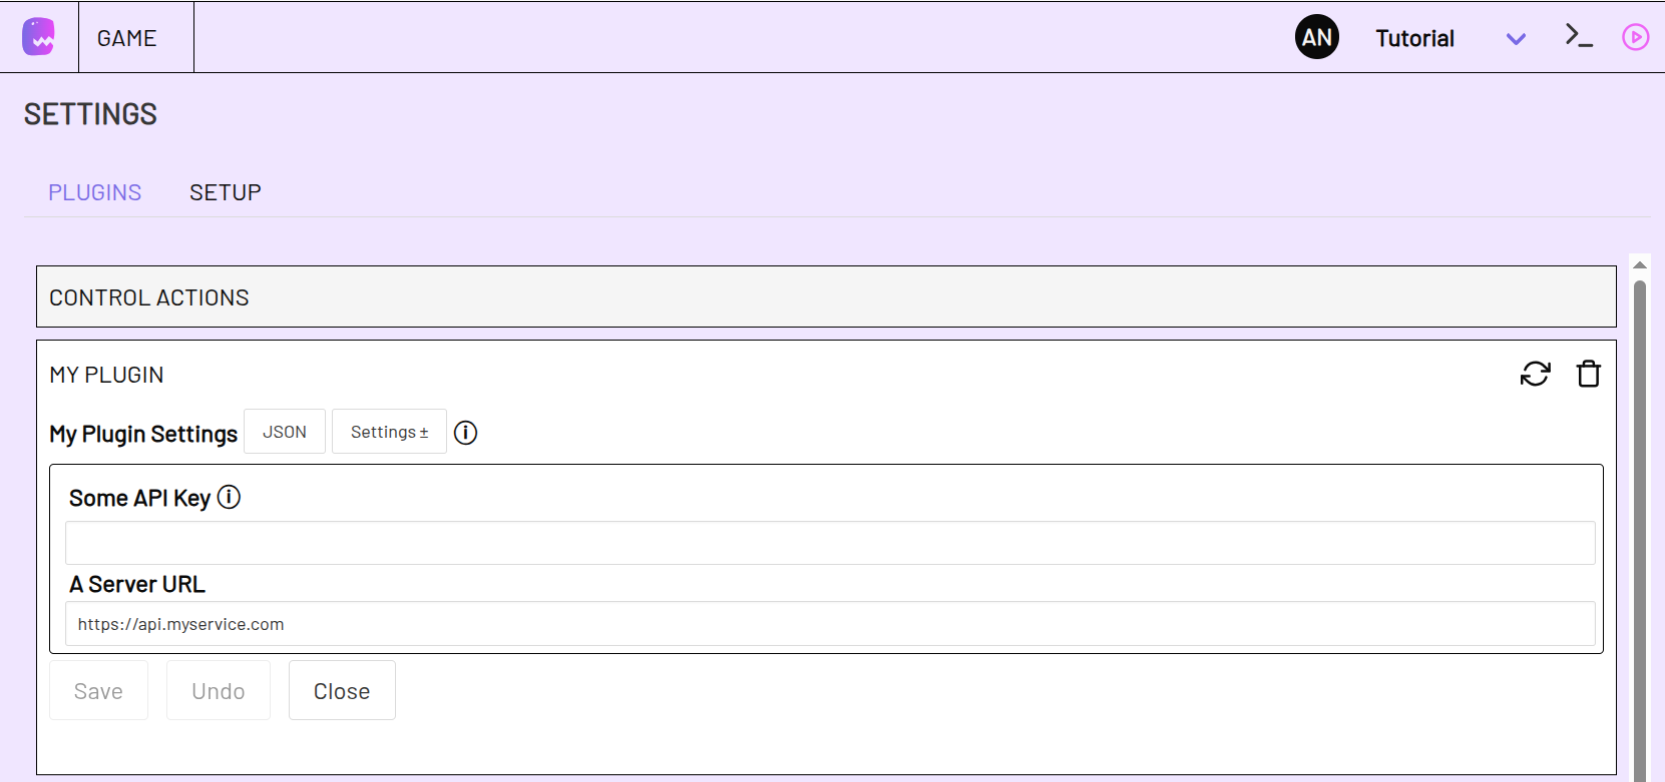
Settings are defined using JSON Schema. The adaptor:ex editor will automatically generate a form based on your schema definition in Game -> settings.
Here is a basic example of a settings schema:
{
    "settings": {
        "type": "object",
        "title": "My Plugin Settings",
        "description": "Configure the connection to My Service",
        "properties": {
            "someApiKey": {
                "type": "string",
                "title": "Some API Key",
                "description": "Some API key from some service dashboard"
            },
            "aServerUrl": {
                "type": "string",
                "title": "A Server URL",
                "default": "https://api.myservice.com",
                "format": "uri"
            }
        },
        "required": ["someApiKey"]
    }
}
The current settings are passed to your plugin's setup function in the config parameter.
let setup = require('setup.json')

class MyPlugin {
    constructor() {
    }

    setup(config, game) {
        this.someApiKey = config.settings.someApiKey
        this.aServerUrl = config.settings.aServerUrl || 'https://api.myservice.com'
        return setup
    }
}

module.exports.Plugin = MyPlugin
update function
If users change and save settings in the editor, the plugins update function is called. Use it to update your local settings values and act on changed values if need be.
class MyPlugin {
    constructor() {
    }

    async update(data) {
        if (this.settings.someApiKey != data.settings.someApiKey) {
            this.settings.someApiKey = data.settings.someApiKey
            await this.connect()
        }
    }
}
load function
The load function is called when the plugin is loaded, for example by the editor, if a user enters the game settings for your plugin. It allows you to update information that is important to be visible in the game settings.
The load function is also called on click of the refresh button in your plugins settings.
class MyPlugin {
    constructor() {
    }

    async load(data) {
        data.allTheOptions = await this.getOptions()
        return data
    }
}
If you extend the Plugin base class you should call super.load(data) in your load function.
command function
If you extend your Plugin (and Item) class with the adaptor Plugin (and PluginItem) base class, you will already be able to get basic information about your plugin via command line and manage plugin items.
To add more command line commands to your plugin or plugin items, add a command function to your plugin or plugin item class. Like the other functions it works like a lifecycle hook and will be called if your plugin or item is queried using the command line.
The command function argument is an array of strings with all words that were typed after the plugin name.
class MyPlugin extends Plugin{
    constructor() {
    }

    async command(input) {
        // Will match if `my_game my_plugin hello` was typed
        if (input[0] === 'hello') {
            this.log('Hello world!')
        }
    }
}
You can find instructions on how to use the adaptor:ex command line in the Server Readme.
connect function
The connect function is called when the user clicks the connect button in the game settings for your plugin.
If the plugin has the autoconnect property set to true, the connect function is called automatically when the function is added to a game or the adaptor server is (re)started.
disconnect function
The disconnect function is called when the user clicks the disconnect button in the game settings for your plugin.
close function
If the game is stopped, either because the adaptor:ex server stopped or the game was removed, the close function is called.
You should release any resources used by the plugin here.
Actions
Actions are the core functionality that your plugin provides to adaptor:ex games. Each action represents something users can do in their game flow, such as sending a message, controlling a device or waiting for something to happen and to react on it.
actions json
Actions are defined in the actions property of your setup json.
Each action has a unique key (the action name) and a schema defining its parameters
{
    "actions": {
        "doSomething": {
            "type": "object",
            "title": "Do Something",
            "description": "Something will happen if you use this.",
            "properties": {
                "someParameter": {
                    "type": "string",
                    "title": "Some Parameter"
                },
                "anotherParameter": {
                    "type": "boolean",
                    "title": "Another Parameter",
                    "description": "Yes or No"
                }
            }
        },
        "waitForSomething": {
            "type": "object",
            "title": "Wait For Something",
            "description": "Listen on some channel and wait for something to happen",
            "mode":"listen",
            "properties": {
                "channel": {
                    "type": "string",
                    "title": "On Channel",
                    "enum": ["alpha", "beta", "gamma"]
                },
                "next": {
                    "$ref": "#/definitions/next"
                }
            },
            "required": ["next"]
        }
    }
}
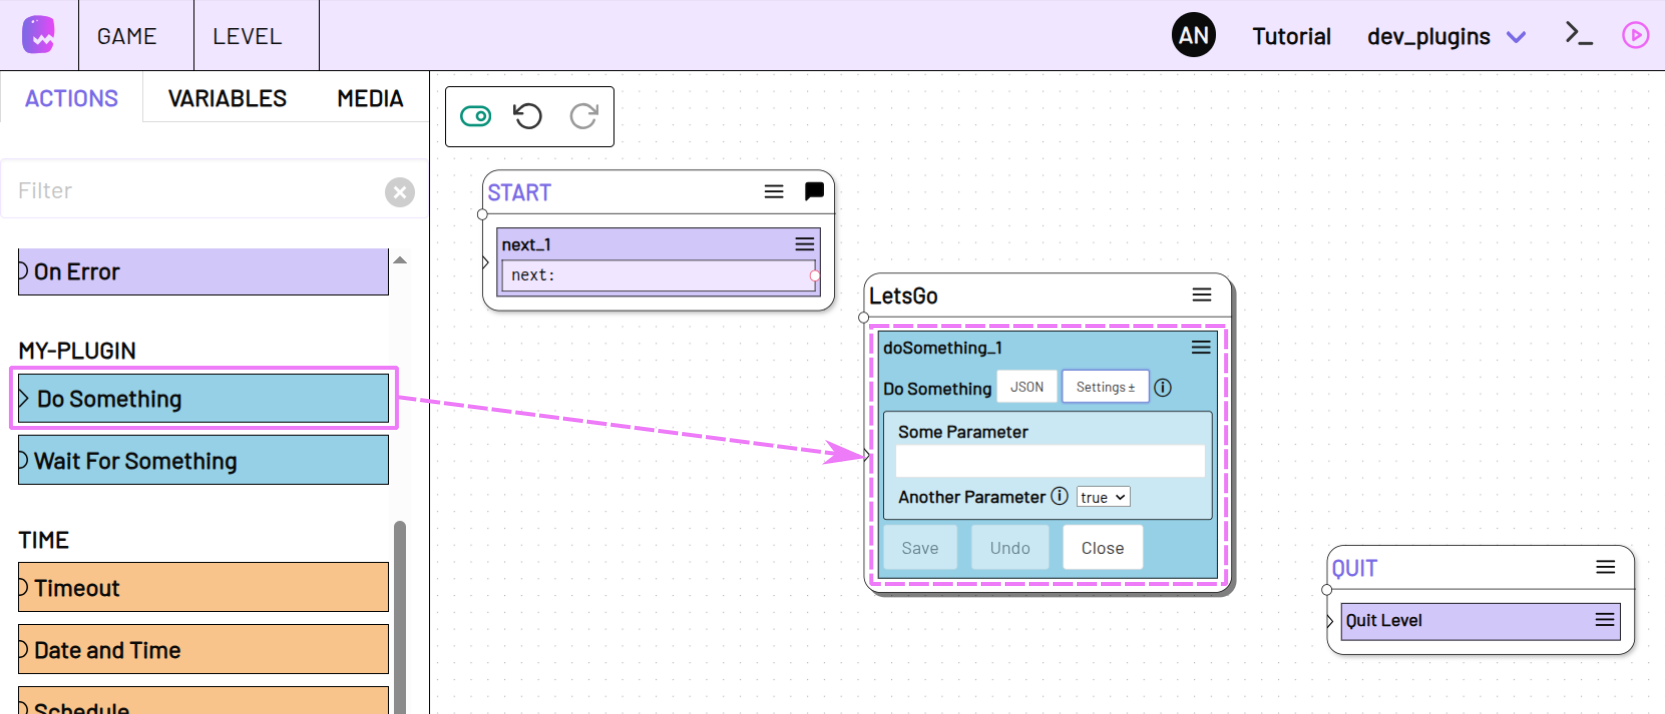
Any action you define in your plugin setup will be added to the game's available actions and can be added to a level from the level toolbar.
action functions
For each action you define, you need to implement a corresponding function in your plugin class. The function name has to match the action key.
For The above example setup the corresponding action functions would be doSomething and waitForSomething
class MyPlugin {
    constructor() {}

    setup(config, game) {}

    doSomething(data, session) {
        // Do something with data.someParameter and/or data.anotherParameter
    }

    waitForSomething(data, session) {
        // Wait for something to happen on data.channel. Then call state data.next
    }
}
module.exports.Plugin = MyPlugin
Action arguments
Action functions can have 2 parameters:
-
data - An object containing the action's properties as entered by the user.
You can access action properties by the property key they have in your action schema. In our example
doSomethingaction that would besomeParameterandanotherParameter -
session - The current game session object, providing context about and access to the running session
The session context allows you to trigger next states, dispatch local session events or get information about the level and state the action was called from. The session context is a subset of properties of the session Class provided by session getAPI().
For example use session.log to log with the proper session context prefix:
Action return values
Action functions should only return, once the action is complete. If the action is asynchronous, you can use async function to return a promise that resolves once the action is complete.
Actions can return 4 types of values
-
string - a followup State that will be triggered after the action is done.
This should always be a value from a
next stateproperty of the action schema. -
function - listen actions can return a cancel callback function that is called by the game once the action should be canceled
-
object - listen actions can return an object with any of the following callback functions:
- cancel - a function that is called once the action should be canceled
- mute - a function that is called if the state the listener is in is not active anymore and should not trigger any next states.
- unmute - a function that is called if the listener was muted before, the state was triggered again. The listener may again trigger next states.
index.jswaitForSomething(data, session) { return { cancel: () => { // Stop your listener from listening e.g. my_event_listener.off() }, mute: () => { // The listener has been muted and next states will be queued but not triggered }, unmute: () => { // The listener has been unmuted and next states will be triggered immediately } } }Mute and unmute callbacks serve the purpose of stacking incoming events to make sure no important events are lost in a looped structure. You need to use them if you want to implement the Keep listening and queue action property.
-
undefined - The action is done and should not trigger a next state or needs to be canceled anytime.
You can return
undefined(or not usereturnor usereturnwithout value) if you do not need anything else to happen.
listen and run actions
The action mode defines wether an action is called once, finishes its business and is done (mode: "run") or if it might live on and wait for stuff to happen (mode: "listen")
-
Actions with mode run are in the top part of a state and have a little triangle icon. They are called before
listenactions. Actions are called from top to bottom and either trigger a next State or pass on to the action below. They have to finish their task before they return and should not take too much time to finish. -
Actions with mode listen are in the bottom part of a state and have a little half circle icon (representing an ear). Just like
runactions they can immediately trigger a next State. Though they may also trigger a next state after the function returned using thenextcallback in thesessioncontext parameter. They can do so anytime until the enclosing State is was left and the listenerscancelfunction was called.
Actions are run actions by default. To define a listen action add the mode property with value listen to the action schema in your setup json.
        "waitForSomething": {
            "type": "object",
            "title": "Wait For Something",
            "description": "Listen on some channel",
            "mode":"listen",
Listen action functions need to return a cancel callback function or an object with cancel, mute and unmute functions.
listener callbacks
To make sure errors are caught properly and your listener can be muted and unmuted, use session.getCallback to wrap your listeners callback function.
    waitForSomething(data, session) {
        const callback = session.getCallback(async (eventData) => {
            session.log(`Event received: ${eventData.message}`)
        })

        // Register callback with your event source
        someEventSource.on('event', callback)

        return () => someEventSource.off('event', callback)
    }
}
next state
Actions with mode: "listen" can call a next state using the next callback in the session context parameter.
The next state has to be part of your action schema so users can select it. Use "$ref": "#/definitions/next" to add the next state select dropdown to your action schema.
            "properties": {
                "channel": {
                    "type": "string",
                    "title": "On Channel",
                    "enum": ["alpha", "beta", "gamma"]
                },
                "next": {
                    "$ref": "#/definitions/next"
                }
            },
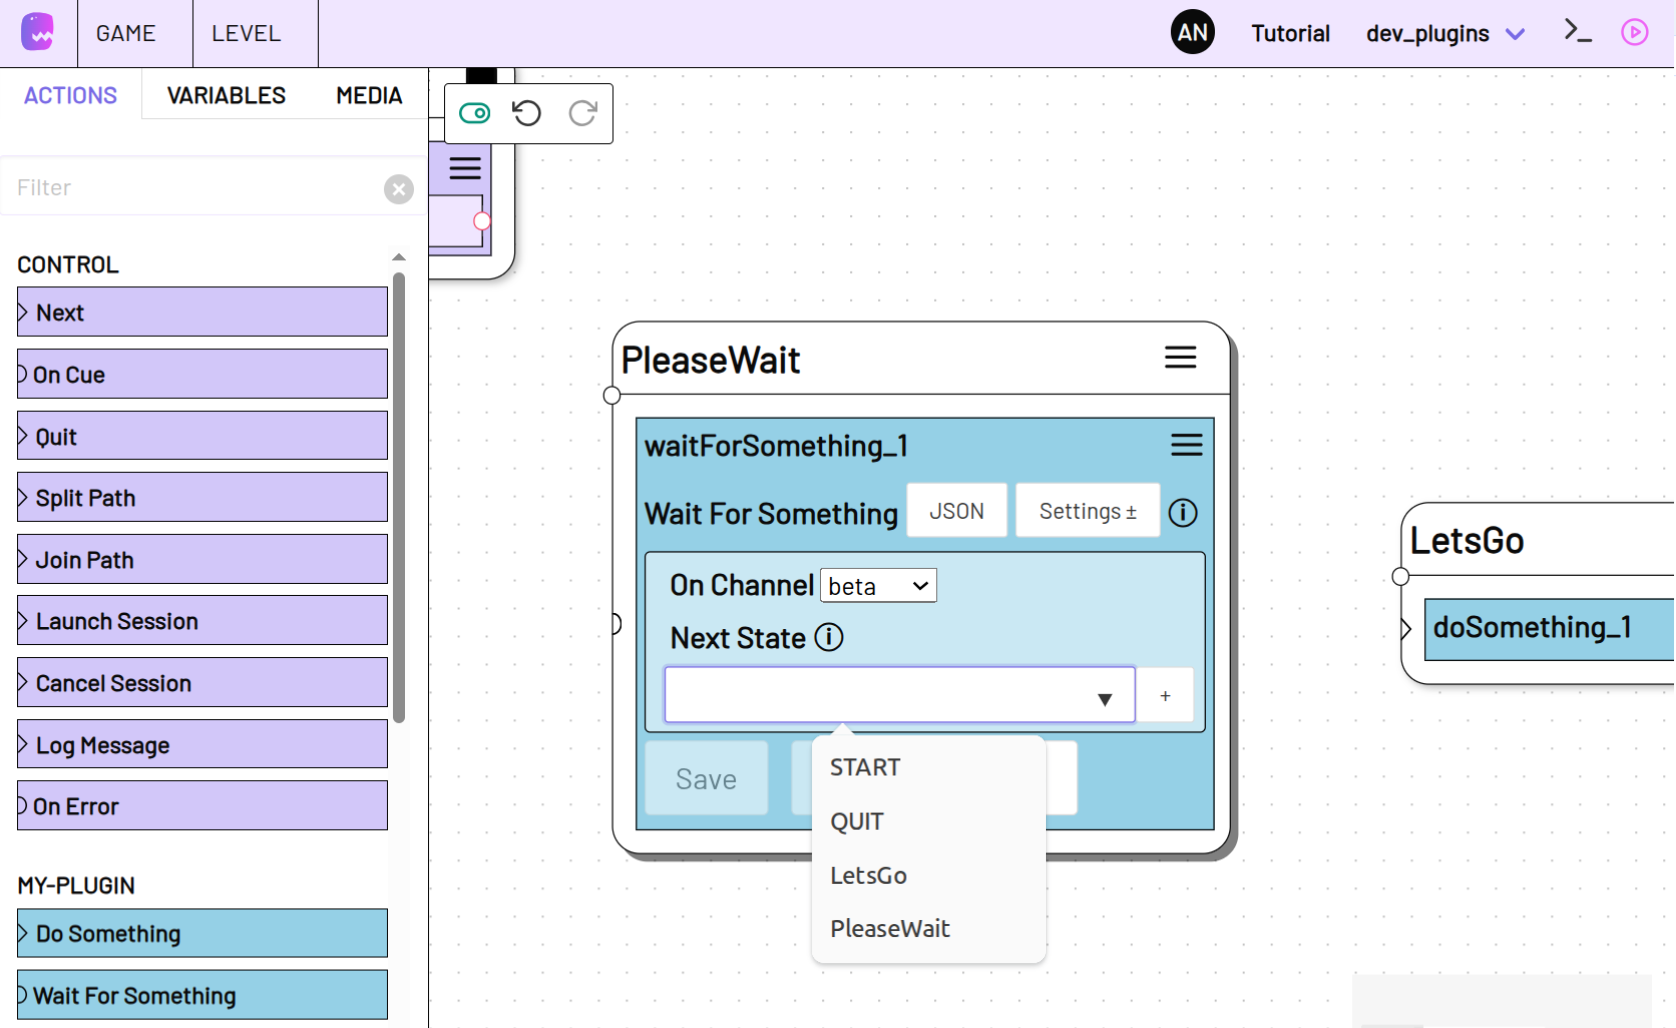
Use the session.next function to call the next state whenever your event occurs.
logging
To make sure your log messages inside action functions have the correct prefix to identify the log origin please use the session.log functions.
You can use one of the following log functions:
session.log.trace()- most verbosesession.log.debug()- Hidden during regular use. Used for debuggingsession.log.info()- Shown by default. Used for important informationsession.log.warn()- Use for warnings that might be importantsession.log.error()- Use for errors that definitely need attention
You can use session.log() as a shorthand for session.log.debug().
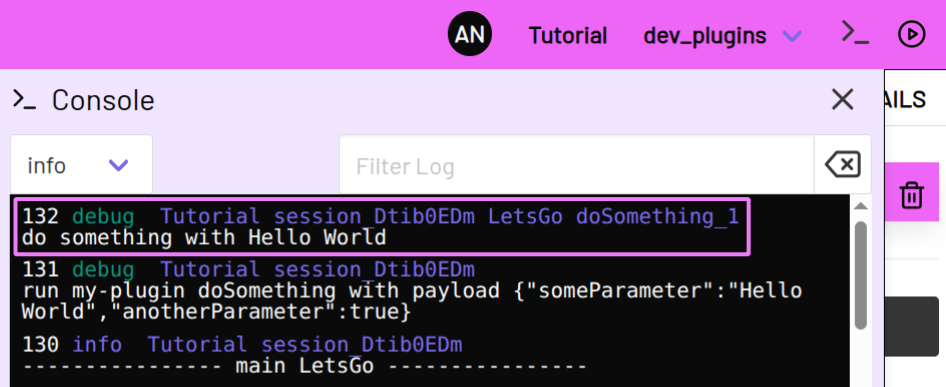
Example
Add the following log command to your run action doSomething
Fill out your action node
Run the action in live mode , open the log console and select debug logging to see your log message
action data
In order for users to see what kind of values your action stores you need to add the action_variables property to your schema.
Provide an entry for each of your actions that stores action data. You can optionally define the data type but, as of now, it is not used in the editor.
{
    "action_variables": {
        "waitForSomething": {
            "message": {
                "type": ["string", "array"],
            },
            "topic": {
                "type": "string",
            }
        }
    }
}
To store data for the current action and make it accessible to the following actions use the store function in session.variables. Any value that was stored can then be used in the same level using dot notation with the path state.<state-name>.<action-name>.
If your action receives any kind of data you should store it so users can access it further on.
    waitForSomething(data, session) {
        my_api.on("message", async (payload) => {
            await session.variables.store({ message: payload.msg, topic: payload.topic })
        })
    }
If the above action was called in a state MyState and was the first Wait For Something action you would use:
[[state.MyState.waitForSomething_1.message]]
To access the value in another action.
Stored action data is overwritten when the same action is triggered again. If you want the data to be stored permanently call store with the persistent parameter set to true.
You are then able to fetch the data using the load function if the action is called again.
other variables
The session.variables property allows access to all other data storage places in the current game project. If your plugin requires a persistent storage that is accessible across actions, take a look at the variables Data Manipulation Methods.
handle variables
By default any adaptor variables in all properties of your action data will be resolved before they are passed on to the action function.
If the user entered a string like "It was a [[Environment.weather]] day", [[Environment.weather]] will be replaced by its current value.
If you want to handle variables yourself, you can add resolveAdaptorVariables: false to the action schema. This might for example be useful, if you want to resolve variables at a later point in time to avoid outdated values.
{
    "actions": {
        "waitForSomething": {
            "type": "object",
            "title": "Wait For Something",
            "mode":"listen",
            "resolveAdaptorVariables": false,
            "properties": {
                "...":"..."
            }
        }
    }
}
The session.variables property provides methods to resolve adaptor variables in your action data.
If you want to replace [[variables]] in a string property use session.variables.review.
    async doSomething(data, session) {
        session.log(`do something with ${await session.variables.review(data.someParameter)}`)
    }
}
If you want all variable values in an array or object to be replaced, use session.variables.findAndReplace.
You can also use findAndReplace if you do not know the data type. It takes any kind of type and will return the value unaltered if it does not contain any strings.
Miscellaneous
In order for you to at least know what this documentation is not documenting, here is a list of some of the things that are not properly covered yet.
Let us know if you have an idea of what topic we should elaborate on next, or if you find out that something was not even mentioned here.
conditions
A number of the integrated plugins have conditions that you can use to control the flow of your game. They all build on the same structure.
All of them make, in one way or another, use of the classes in the Logic Plugin
You can access the logic module through the global adaptor variable with adaptor.logic.
There are also schema references like "$ref": "#/definitions/equals" you can use to avoid redundancies in your condition schema.
Plugin base class
The Plugin base class should of course be part of the reference. Until then, please checkout the Plugin base class source code.
plugin items
This is a big one. Plugin collections allow users to create multiple instances of a specific type of item within your plugin. This is useful when your plugin needs to manage multiple connections, devices, accounts, or any other entities that have individual settings.
For example: - Multiple physical devices (each with its own IP address and port) - Multiple user accounts or API tokens - Multiple message channels or rooms
The Socket.IO plugin allows to create multiple socket.io namespaces. Take a look at the Socket.IO plugin source code to get a hint on how to use collections in your own plugins.
Plugin Items should always extend the PluginItem base class and their constructor should be forwarded to the Plugin base class setup function.
Data Items
If your plugin needs persistent values that can be accessed throughout the game it might make sense to add a plugin specific data collection. The OpenAI Plugin uses a data collection to store the conversation history. Checkout the source code here for an example.
Events
When building adaptor:ex games, events are handled by the Dispatch Event and the On Event actions. Most of the times it makes sense to leave event handling to these core actions. But it is possible to throw your own events in there too. It gives you an easy option to not build custom listener actions for your plugin.
Checkout session.event and game.event for how to throw your own events that can be caught with the On Event action.
Apart from that there are some internal status events that come in handy to avoid race conditions.
Messenger
To make it easier to integrate plugins interfacing with a type of chat or messaging platform it is best to make use of the Messenger module.
It provides helper methods to send messages and to listen for incoming messages and handle multiple messenger user and agents.
Take a look at the Telegram plugin and its source code to get a hint on how to use the Messenger module.
Use other plugins
It is generally possible to use other plugins within your own plugin.
classes aka prototypes
For some fundamental plugins like logic, classes are available through the global adaptor variable.
For all other modules it is more complicated because you will not know where to find the plugins module and of course you do not know if the plugin is even there. To use other modules apart from the ones available via the global adaptor variable, you will have to add them to your plugins dependencies.
instances
To get the running instance of a plugin you can use the game.getPlugin method. Always make sure to check if the plugin is available before using it. You may need to handle possible race conditions, since you can not know which plugin is loaded and/or connected first.
error handling
Most of the time any error thrown inside your plugin will be caught and logged and users should be able to handle them with the On Error action. Best is to always throw or rethrow errors and not catch them if you do not have something specific in mind.
Even better, for your own and known errors, is to use one of the error classes accessible in the global adaptor variable.
schema definitions
A list of schema definitions available to use in your plugin setup would be of course nice to have. As for now we can only encourage you to look into the setup.json or schema.json of the integrated plugins.
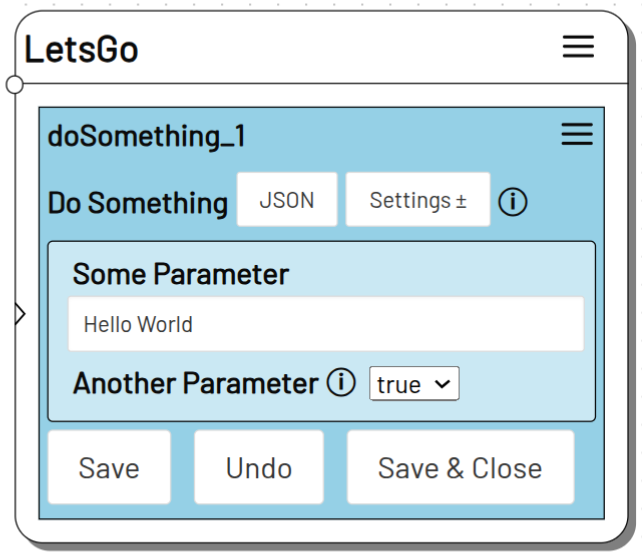
Editor action templates
If you close an action in the editor, the action node shows a brief summary of it's current data and settings. You can define in detail what should be shown and what may be hidden by creating templates for each of your actions. Templates are defined in your plugin setup json in the respective action schema.
Browse through the source code of integrated plugins to see how to define templates for your actions.
The Plugin base class provides a number of helper methods to make it easier to create templates and add them to your actions setup schemas.
http endpoints
You can make use of the existing web infrastructure of adaptor:ex. To prevent conflicts with other modules you should always build on top of the custom endpoint provided for your plugin.
To create a new HTTP Endpoints use the express app provided by the config parameter via the Plugins setup function (config.app). It will prepend {baseUrl}/{game}/{your-plugin} to all your endpoints.
Documentation
If you find the time we are happy if you add instructions on how to use your plugin to the adaptor:ex documentation. Feel free to create a PR to the adaptor:ex documentation repository.
If documentation is available somewhere, add the the homepage key to your package.json.
{
    "name": "your-adaptorex-plugin",
    "homepage": "https://docs.adaptorex.org/basics/plugins/your-plugin"
}
This will create a link to your documentation in the adaptor:ex editor Game > settings.
You can always default to your repository readme
To add a link to your documentation for each of your actions in the level editor Toolbar, add the "documentation" key to your action schema.