Socket.IO
Connect adaptor:ex to any type of website or web app that has a Socket.IO interface. Socket.IO allows communication in both directions between APP and server.
With the Socket.IO plugin you can connect any number of Namespaces and organize messages via rooms.
The Socket.IO plugin can also be integrated into your own plugin to customize actions and functionalities for specific Web APPs.
Setup
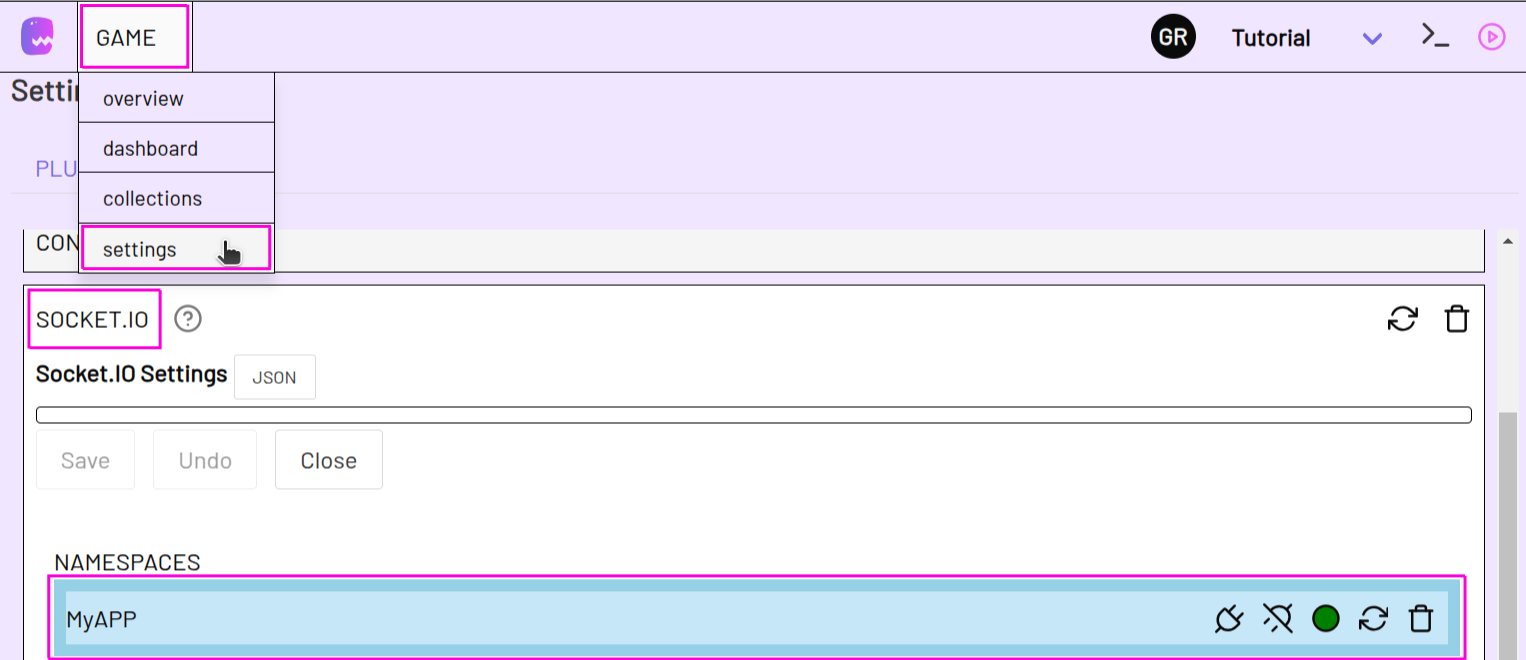
Add the Socket.IO plugin via Game -> Settings and create one or more socket.io namespaces.
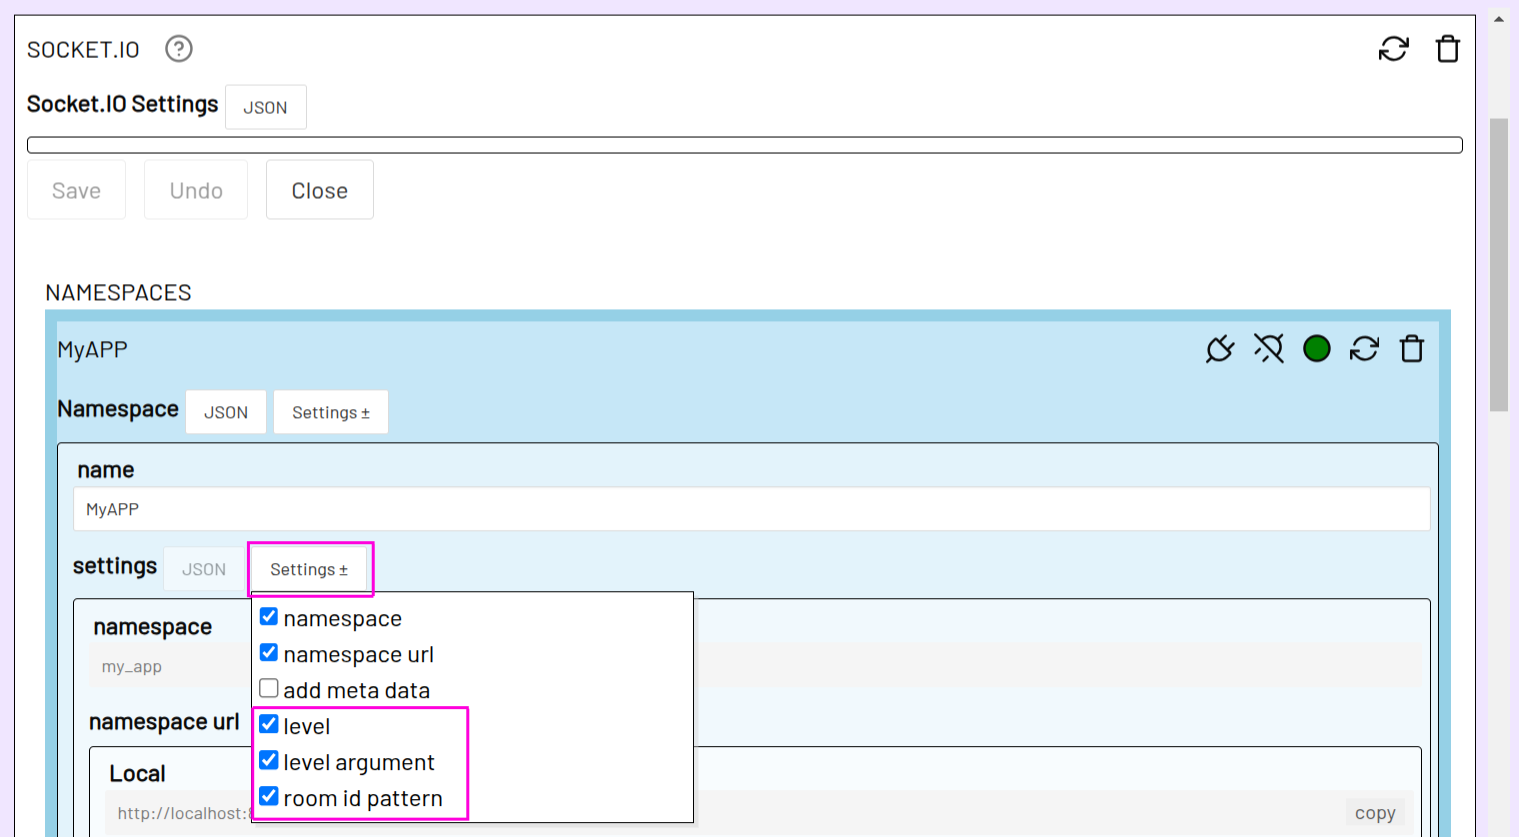
You can add further options for the namespace via the Settings menu.
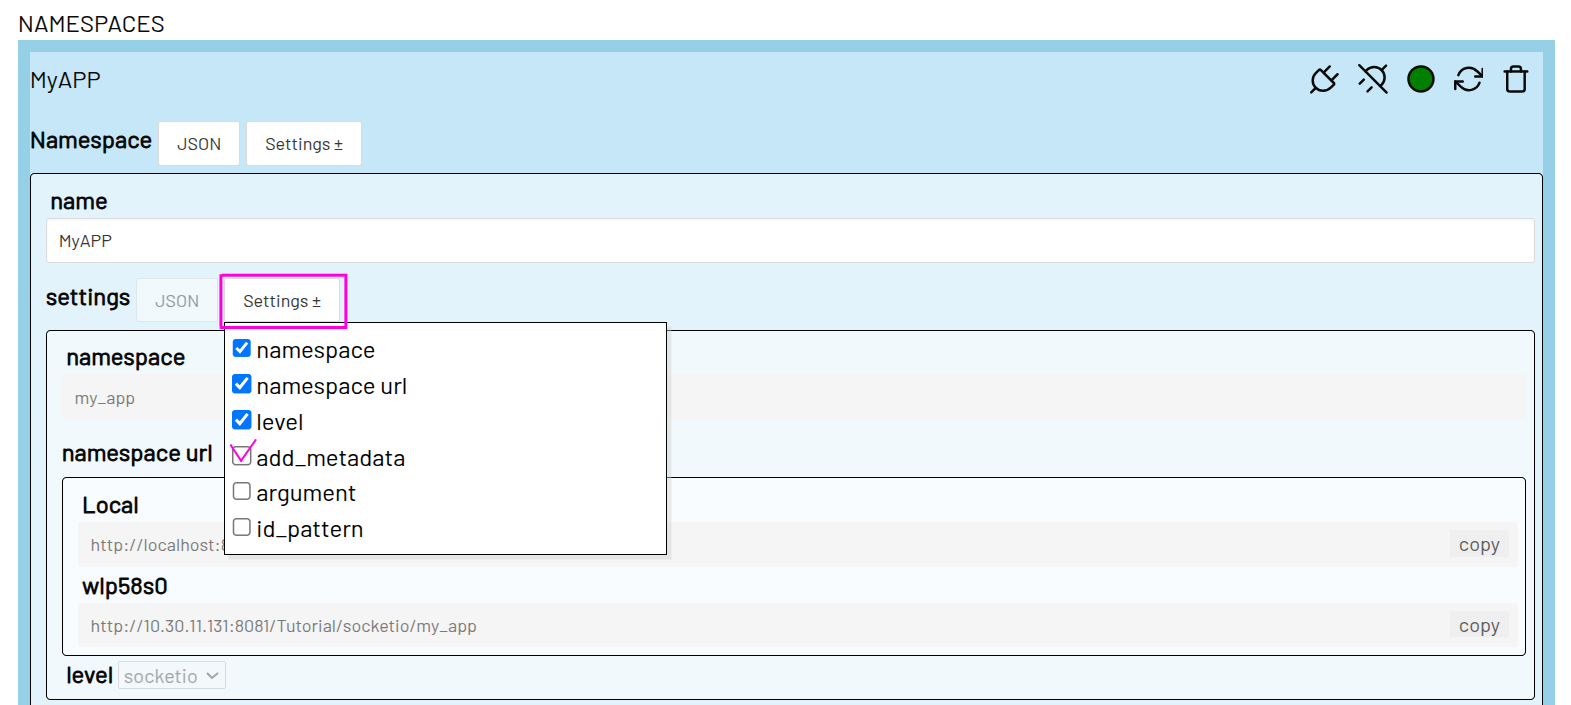
namespace
optional
The name of the socketio namespace web clients can connect to. The namespace url consists of the adaptor:ex server url (e.g. localhost:8081), the game name, the name of the plugin (here socketio) and this namespace name. The complete connection URL looks something like this:
http://localhost:8081/TestGame/socketio/test_namespace
If you do not specify an explicit namespace name, the name of the namespace item is used as the namespace name.
The full URl via which the client can connect is specified under namespace url and will be displayed once you hit Save.
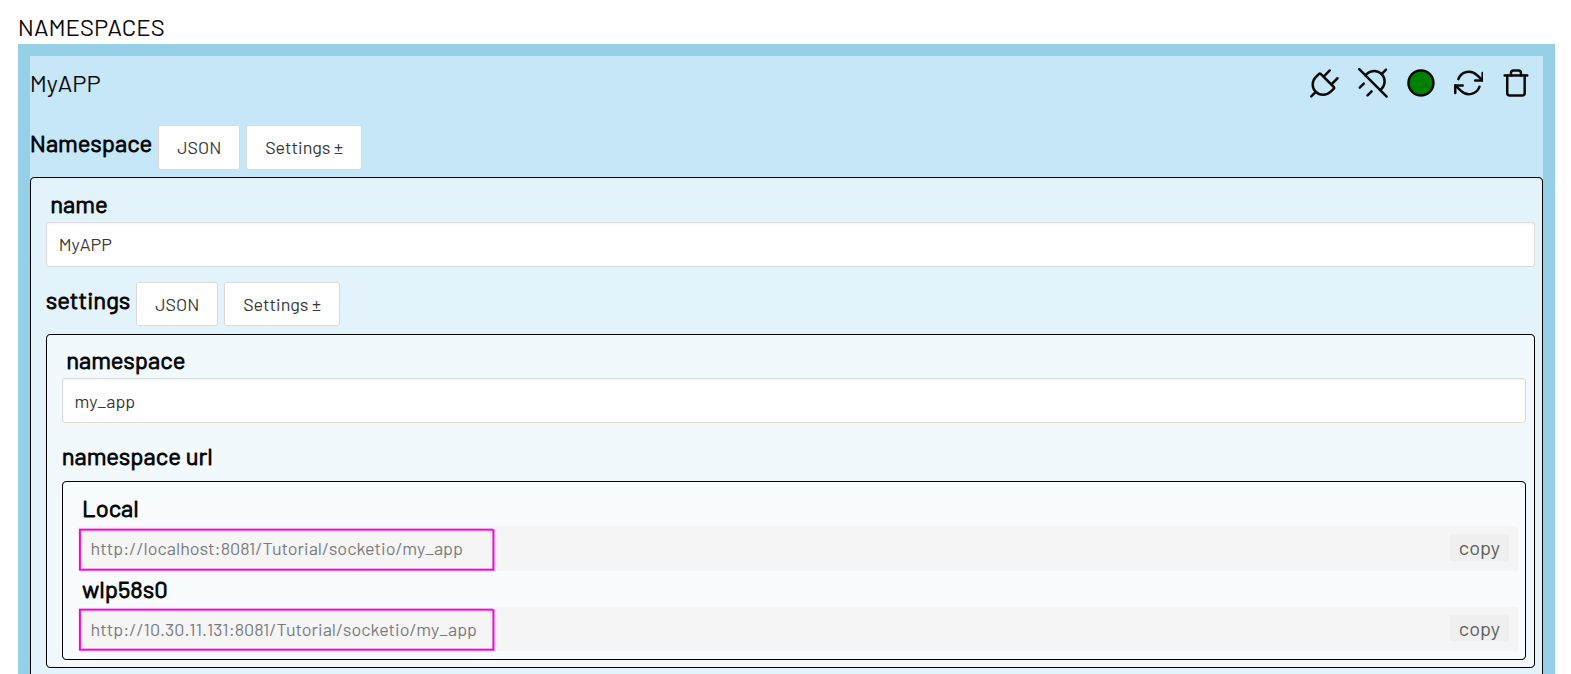
The available base URLs depend on your network and your adaptor:ex server configuration.
add meta data
optional
If add meta data is selected, all messages that are sent to the client with this namespace are extended with info data.
The following properties will be added:
-
timestamp: Time and date as unix timestamp on which the message was sent
-
message_id: a unique ID for the message
-
room: The room to which the message was sent
The message itself is sent in the data property.
Messages that are sent to the client in this way are always js objects.
A message my message to the client in the room with the ID my_room with additional metadata might look like this:
{
  "data": "my message to the client",
  "timestamp": 1737027084827,
  "message_id": "mNeMIgMf",
  "room": "my_room"
}
level
optional
Level that will be started automatically when the client sends a message via the create topic and creates a new room.
level argument
optional
Enter the name for a Level Argument that contains the data for the room that was newly created with create.
name
The Level Argument name via which you can access the room data in the level.
type
If you specify string as the data type, the level argument will contain the room id.
If you specify object as the data type, the level argument will contain all the data that has been stored for the room.
If you specify a Data Collection as the data type, a new item will be created in the corresponding collection whenever a room is created with create. You can then access the newly created item via the Level Argument.

room id pattern
optional
Set a string format that is used when a new room with an automatic id is created with create.
Under length, enter the number of characters that newly created room ids will have. In characters you can specify the set of characters that will be used when room ids are created automatically.
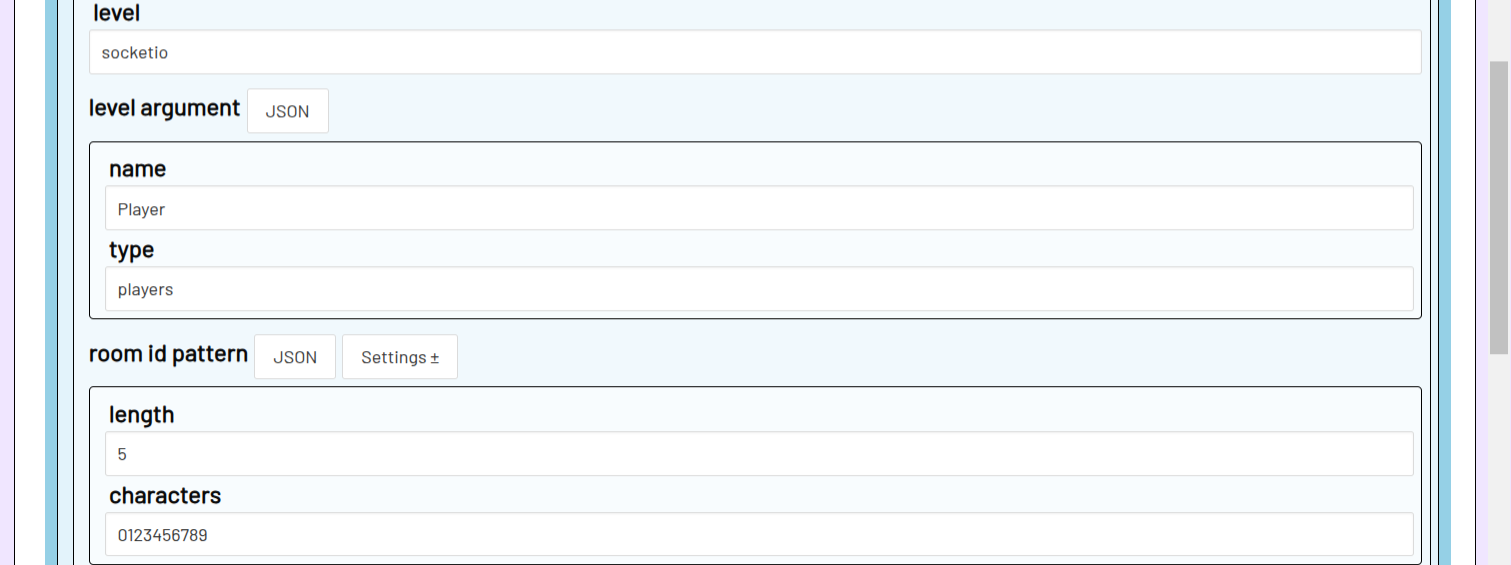
In this example, room ids for this namespace will be 5-digit numbers:

Create and join rooms
Namespaces in the Socket.IO plugin offer the option of creating and joining rooms via the client. Messages that are exchanged in a room are only received by clients that have joined the corresponding room via join.
The following socket.io topics are reserved for this purpose.
create
Creates a new socket.io room. The room id and any other properties will be saved in the corresponding namespace Item.
If you set a default level in the namespace settings, a session of the specified level will be started with create if the room does not yet exist.
If you set a level and level argument in the namespace settings, and level argument type is a data collection, a data item will be created. Room information will then be stored in that data item instead of the namespace item.
The client automatically joins the newly created room (join)
create returns a duplicate error via socket.io callback or emitWithAck if the room already exists.
topic: create
message: The room id and any other properties that are to stored.
If message is a string, a room with the corresponding id is created. String message Example:
If message is an object, all properties of the object will be stored in addition to the rooms id. To assign your own id, the message must then contain an id property. Object message Example:
If message is empty, or if no id property exists, an automatic room id will be created. The id format can be defined via the namespace setting room id pattern.
The automatically generated room id is returned via socket.io callback or emitWithAck.
returns: Returns an object including the room id. In example:
join
Makes the client join the specified room. If the room is used in a Socket.IO action, this client will then be included in the communication.
join will return a not found error via socket.io callback or emitWithAck if the room does not exist.
topic: join
message: The room id as a string. Example
returns: Returns the room id and all data associated with the room. Example:
leave
Makes the client leave the specified room again.
topic: leave
message: The room id (string) of the room to be left. Example:
You can send message all to leave all rooms.
rooms
Returns a list of all rooms that the client has joined.
The message all returns all rooms that exist in the namespace.
topic: rooms
message: If message is empty, only the rooms that the client has joined with join are returned. Use
to get all rooms that exist in the namespace the client is connected to.
Actions
-
Send Socket.IO Message sends data to a socket.io client of a website or Web APP.
-
On Socket.IO Message allows you to react to incoming messages from a client of a website or Web APP.
Example
Level File: socketio_example.json
HTML File: socketio_example.html
Open your adaptor:ex game and set up the Socket.IO plugin with a namespace (see Setup).
Create an .html file containing a basic HTML web page and add the socket.io client library.
For example:
<html>
    <head>
        <title>adaptor:ex socket.io plugin example</title>
        <meta charset="utf-8">
    </head>

    <body>
    </body>
    <script src="https://cdn.socket.io/4.8.1/socket.io.min.js"></script>
    <script>
        console.log("Let's get started!")
    </script>
</html>
Copy the namespace url from the Socket.IO plugin settings and create a connection to your namespace in the script part of your website.
<script>
    console.log("Let's get started!")
    const socket = io("http://localhost:8081/Tutorial/socketio/my_app")
</script>
Now you can use the socket.io client library functions to exchange data between your website and your adaptor:ex game.
Send a message to your website
Test the connection by creating a new Level and dragging a Send Socketio Message onto the stage.
Leave room empty and enter a topic and a simple message.
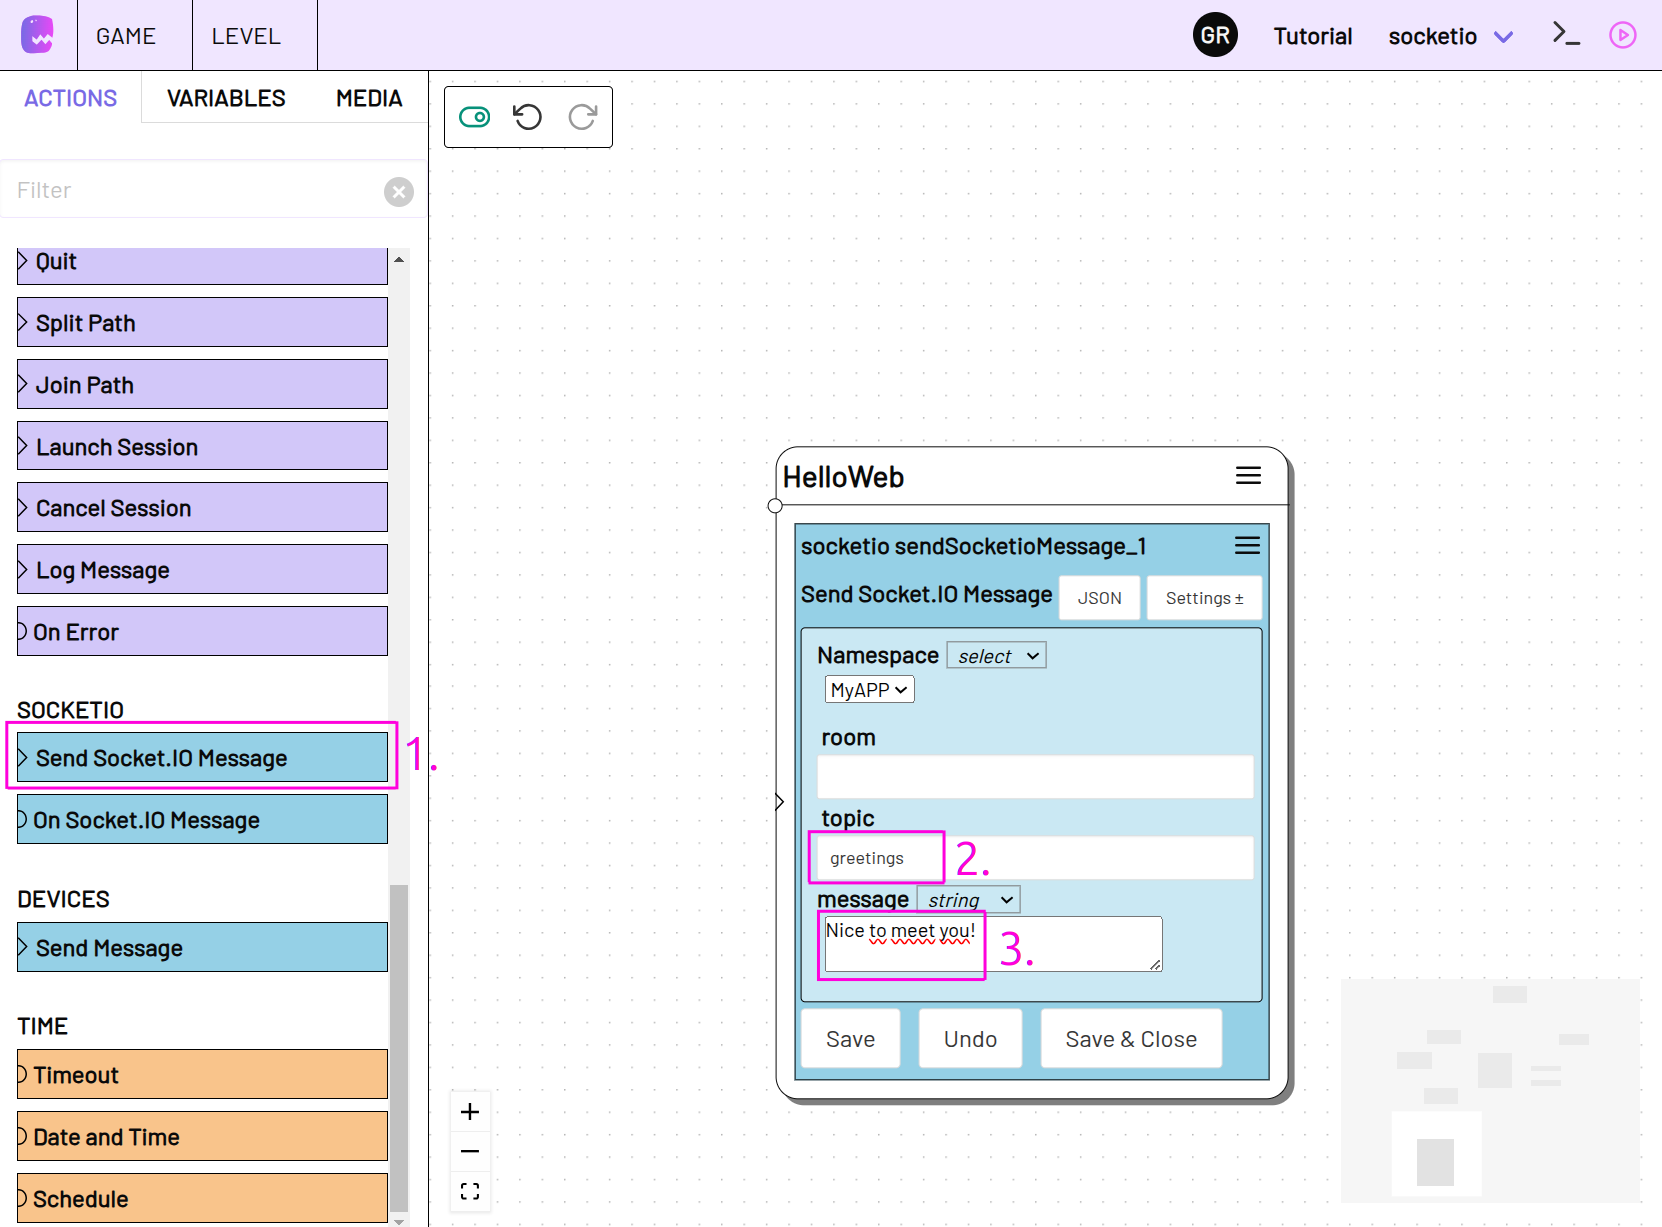
In the script part of your website add a socket.on function with the respective topic and use console.log to write incoming messages to the console.
<script>
    console.log("Let's get started!")
    const socket = io("http://localhost:8081/Tutorial/socketio/my_app")

    socket.on("greetings", message => {
        console.log(message)
    })
</script>
Open the developer console of your browser (e.g. with Ctrl+Shift+I)
In adaptor:ex, create a new session from your level and trigger the state that contains the Send Socket Message action.
If the connection between adaptor:ex and the website works, you will see the message you sent via the Send Socket Message action in the developer console.
Receive a message from your website
Add a button to your web page, to send data to the adaptor:ex server.
Then link the button with the socket.emit function.
<script>
    const socket = io("http://localhost:8081/Tutorial/socketio/my_app")

    function sendGo() {
        socket.emit("button", "go", (response) => {
            console.log(response)
        })
    }
</script>
Add an On Socket Message action to your level in adaptor:ex, in which you react to messages on the topic button.
On Socket.IO Message
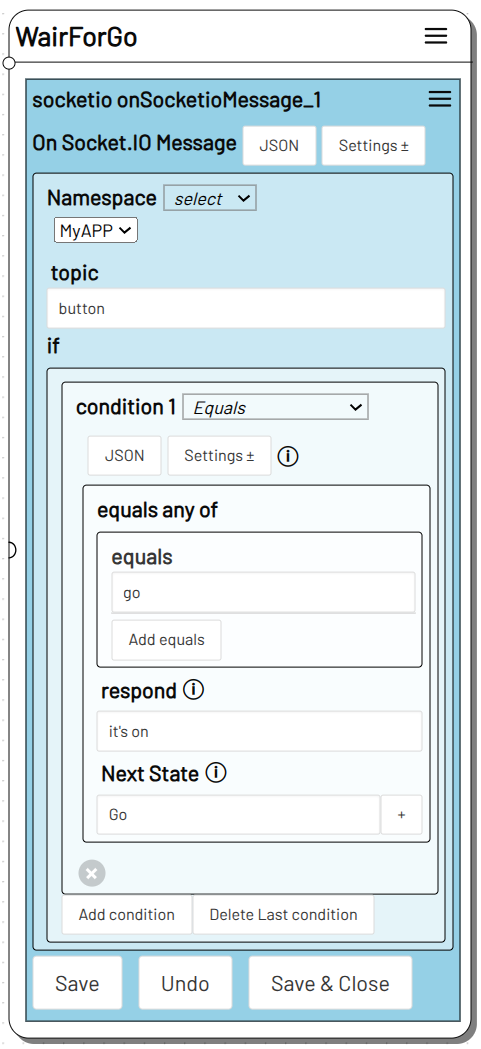
Create a new state Go that is to be triggered when the button on your page is clicked. If you now trigger the state with the On Socket Message action and click on the "GO" button on your website, your session should switch to the Go state.
WaitForGo is triggered. The GO button is then clicked in the browser
Create a room
Add two new buttons to your web page
<body>
    <button onclick="createRoom()">CREATE</button>
    <button onclick="joinRoom()">JOIN</button>
    <button onclick="sendGo()">GO</button>
</body>
Then link the buttons to the socket.emit function with the topics create and join.
<script>
    const socket = io("http://localhost:8081/Tutorial/socketio/my_app")

    function createRoom() {
        socket.emit("create", "myroom", (response) => {
            console.log(response)
        })
    }

    function joinRoom() {
        socket.emit("join", "myroom", (response) => {
            console.log(response)
        })
    }
</script>
If you click on create, a new socket.io room is created in adaptor:ex.
Now set the room option in adaptor:ex in the Send Socket.IO Message and the On Socket Message action to myroom.
If you open your page in another browser window or tab, messages are now only exchanged with the pages that have joined the room via the JOIN button.
Use rooms for game, player and session management
The socket.io rooms are ideal for managing different sequences of separate games or players in a shared game round. With the Socket.IO plugin, you can automatically create room IDs that are linked to a session of your adaptor:ex level. Users of your website can then create new game rounds or join an existing game.
Open the settings of your namespace in the Socket.IO plugin settings under Game -> Settings.
Add the options level, level argument and room id pattern to the namespace via the Settings menu.
In the level option, enter the name of your newly created level (here socketio).
We can use the already existing players collection to store room information. Enter as level argument name a name under which you can address the room infos (here Player). As type enter the collection in which new room items are to be created (here players).
If you want, you can use room id pattern to customize the format of the automatically generated room names (here length: 5 and characters: 0123456789).
Click Save to apply the settings.
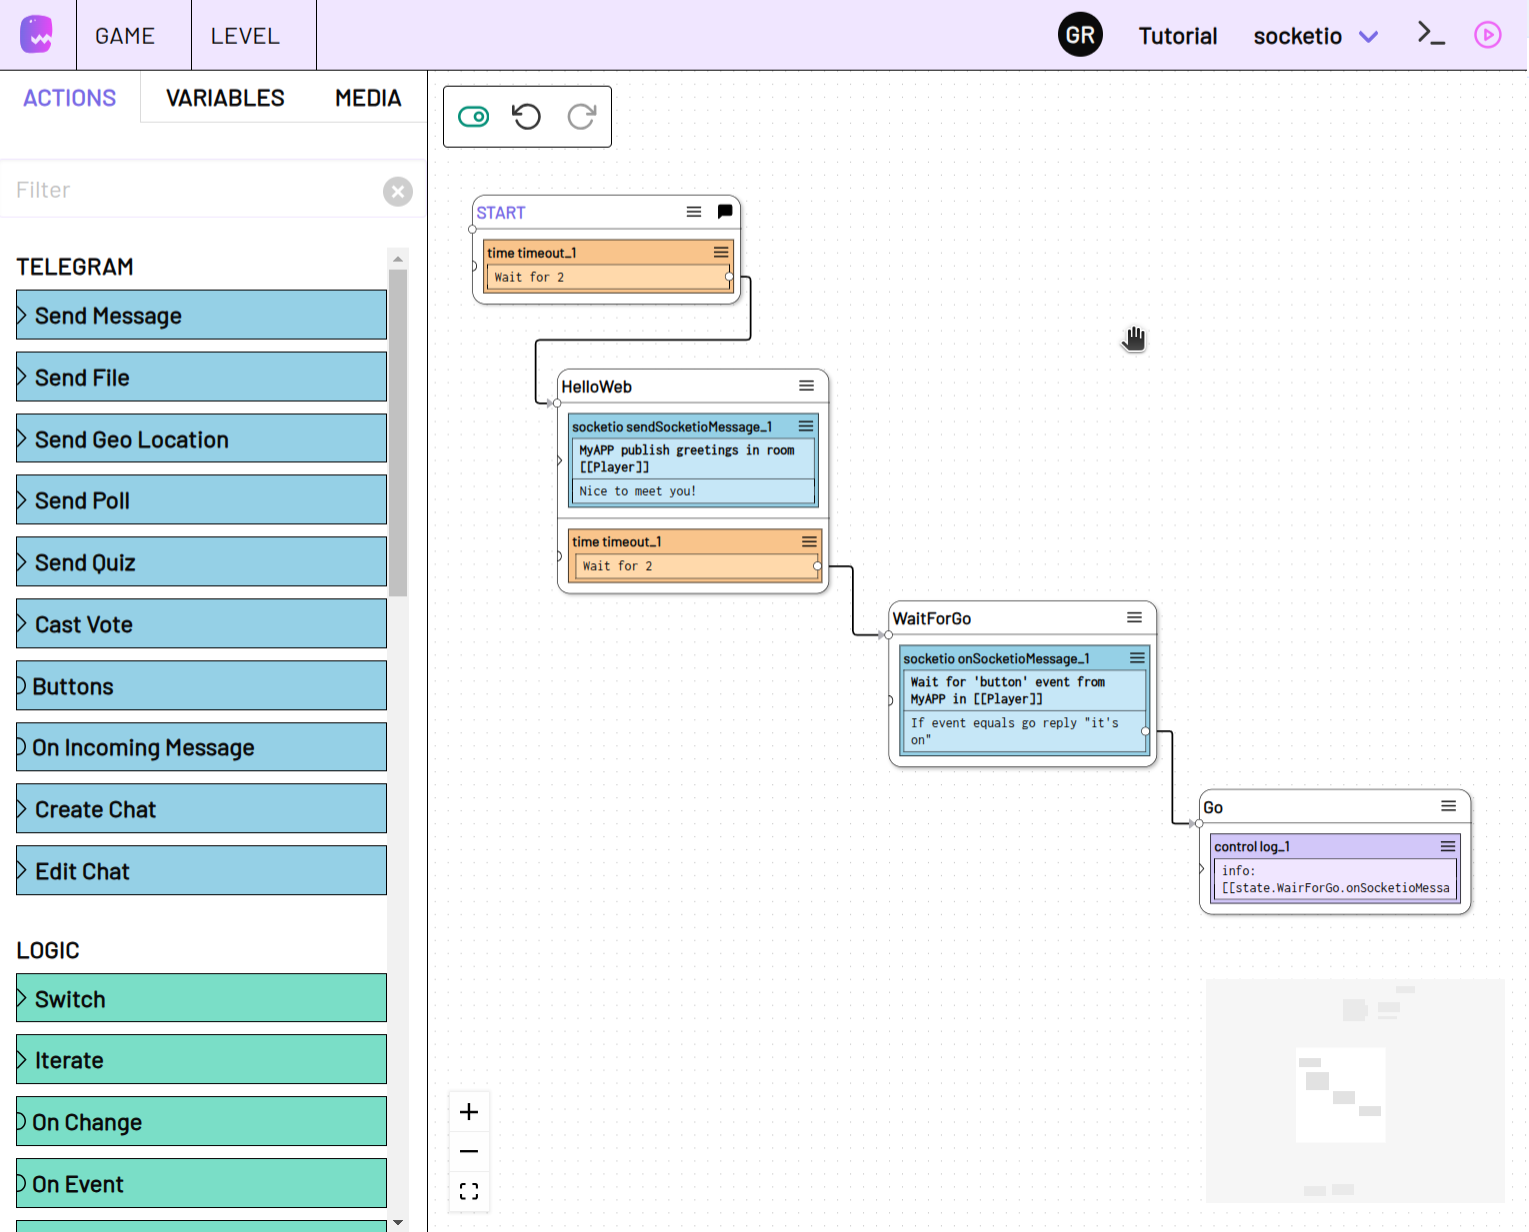
In your level, adjust the room options in the Send Socket.IO Message and On Socket Message actions. Use the value you specified as level argument name (here Player) as a variable.
Send Socket.IO Message
![room is replaced with [[Player]]](assets/socketio_example_level_argument.png)
Note
If a room is created the room id is stored in the newly created players item under socketio.id. If you use a data item in the actions room option like here, the Send Socket.IO Message action will look for the id property in the respective item. [[Player]] is therefore a synonym for [[Player.socketio.id]].
Connect your actions via a Next or Timeout action with the START state and with each other.
Now remove the room name in your createRoom function on your website. A name will then be generated automatically when you click the button.
The newly generated room id is returned in response. From now on it can be used to connect to the same session.
To make that possible, create an output field and an input field on your website, e.g:
<body>
    <button onclick="createRoom()">CREATE</button>
    <span id="new-room"></span><br>
    <input id="room" type="text" placeholder="Enter room">
    <button onclick="joinRoom()">JOIN</button><br>
    <button onclick="sendGo()">GO</button>
</body>
function createRoom() {
    socket.emit("create", "", (response) => {
        console.log(response)
        document.getElementById("new-room").innerText = response.id
    })
}

function joinRoom() {
    const room = document.getElementById("room").value
    socket.emit("join", room, (response) => {
        console.log(response)
    })
}
Switch to live mode in your level and delete all existing sessions . If you now click on the CREATE button on your website, a new session will be started. A message is then sent to the client in the HelloWeb state. As soon as the WaitForGo state has been triggered, the session waits for the Go button to be pressed.
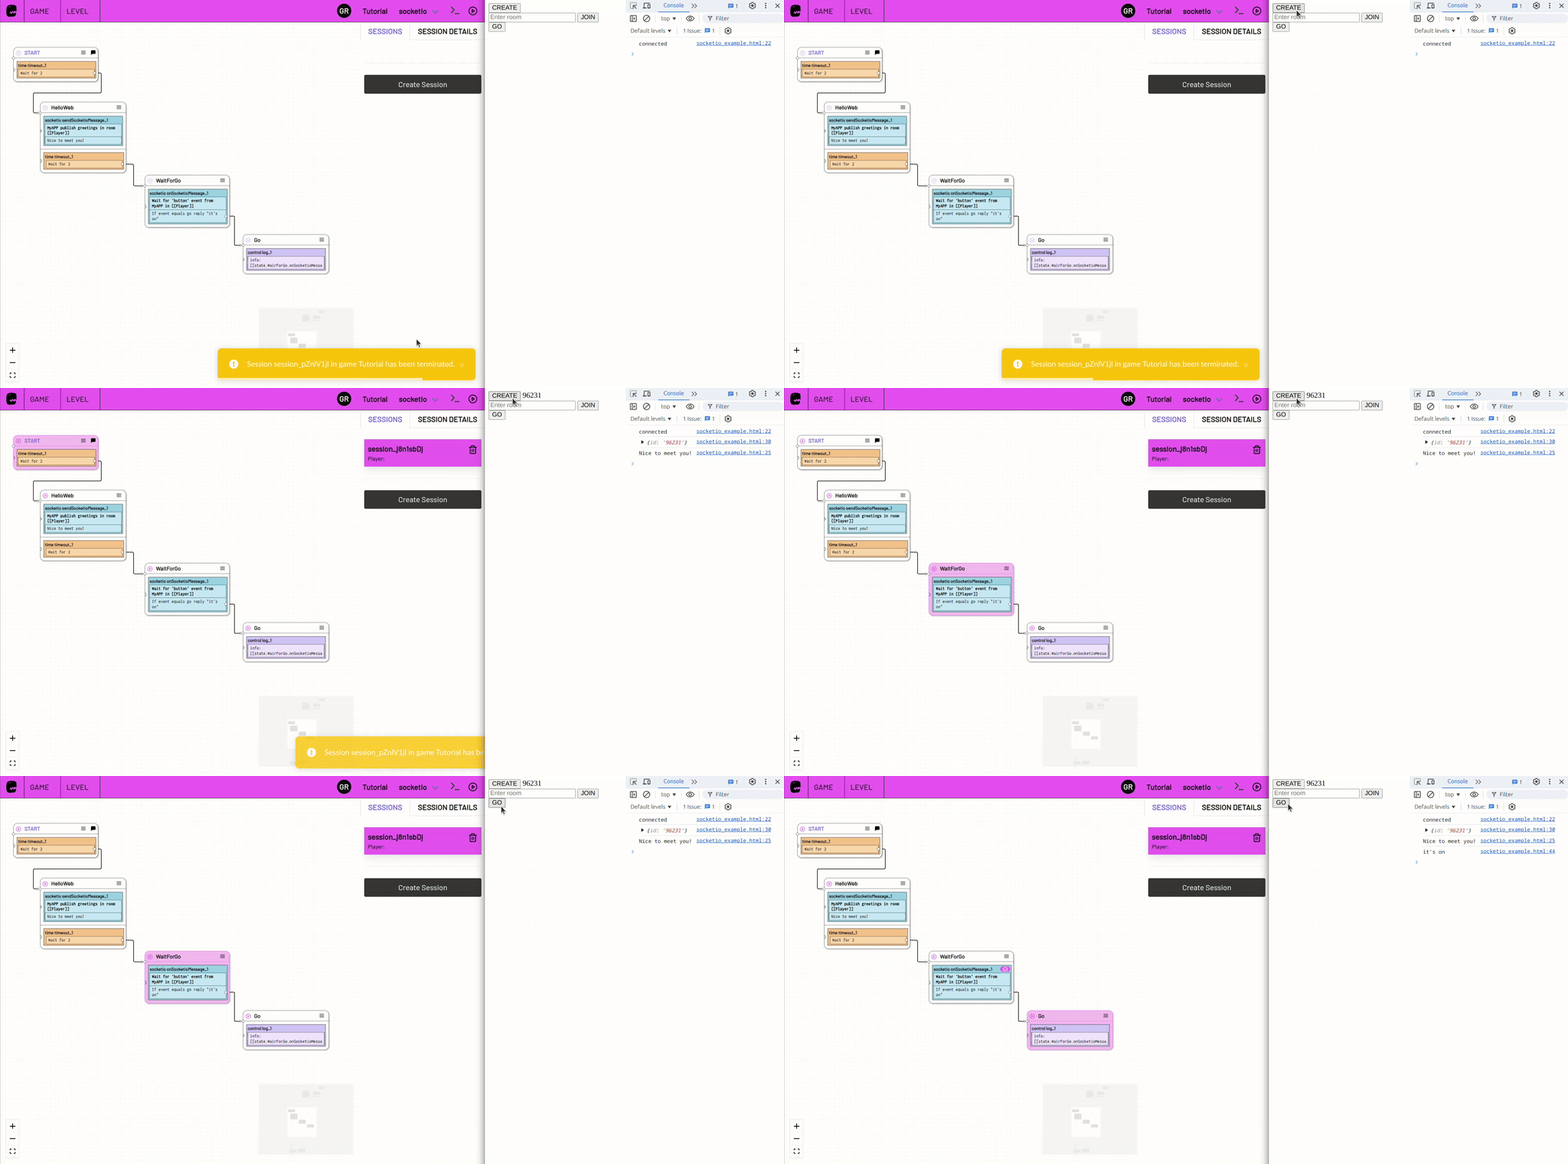
As create automatically performs a join and joins the newly created room, you do not need to explicitly use join at this point. From now on, however, you can join the newly created room and thus the session of your level with the specified id after a page reload or in another browser window or tab.
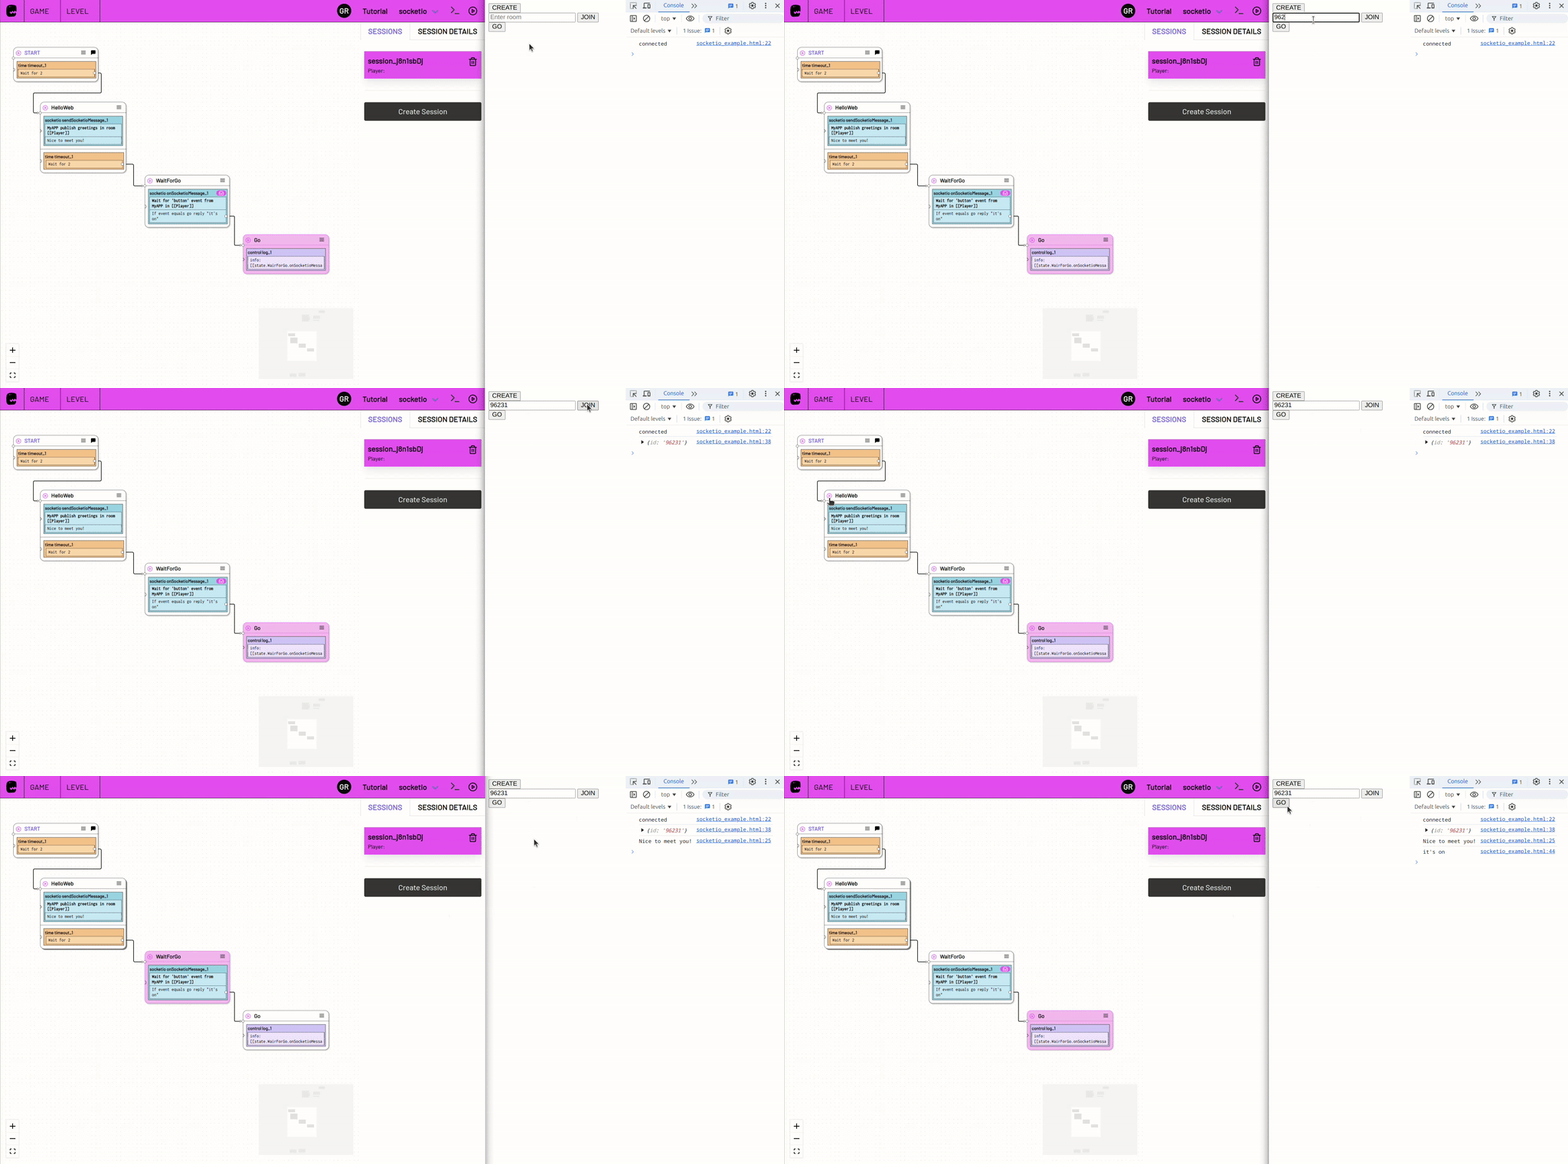
If further rooms are now created, this ensures that each game or player starts an independent session.
With each room, a separate Data Item is created in the players collection in this setup. Using the level argument (here Player), you can also save data that is important for the individual course of the game, e.g. with the Set Variable action.